

You've probably hit this point already. The formula is dialed in, the scent is right, the texture feels good, and friends keep asking for another bottle. Then packaging steps in and turns a fun project into a string of decisions about materials, closures, labels, fill lines, and shipping boxes.
That's why the 1 oz bottle comes up so often for independent makers. A standard 1 U.S. fluid ounce is 29.5735 mL and packaging specs often round that to 30 mL, which sounds tiny until you're filling a batch and realize even a small mismatch can affect headspace and label claims, as noted in this packaging guide on 1 ounce bottle sizing. It's a small format with big consequences.
For makers selling skincare, tinctures, extracts, fragrance, sauces, and other concentrated products, this little bottle can be a smart middle ground. It feels polished, travels well, and gives you room to test a product line without jumping straight into bulky packaging that ties up cash.
Table of Contents
- Your Guide to the Mighty 1 oz Bottle
- Start with the product, not the bottle
- Glass versus plastic in real life
- Closures decide the customer experience
- Build a process before you fill a batch
- Match the seal to the product
- Seal, then test like the package will be used
Your Guide to the Mighty 1 oz Bottle
You finish a small batch, line up your bottles, and realize the container is making half the decisions for you. A 1 oz bottle can make a product feel giftable, easy to test, and worth the price, or it can make careful work look like an afterthought.
A 1 oz bottle works well for products that need a small, controlled format. It suits concentrated blends, trial sizes, daily-use formulas, and anything a customer wants to carry in a pocket, purse, or dopp kit. For an independent maker, that matters. Smaller fill sizes lower the buy-in for first-time customers and let you test demand without tying up cash in large, risky runs.

The bottle's job is balance. You need something that protects the product, feels right in the hand, and still leaves room for profit after packaging, labels, shipping materials, and spoilage. Big brands can hide a bad packaging decision inside volume discounts. Small makers usually cannot.
I have seen makers spend extra on a beautiful bottle, then lose that gain with leaky caps, slow filling, or labels that wrinkle on curved glass. I have also seen plain packaging outperform fancy options because it shipped cleanly, photographed well, and kept the formula stable. That is the practical mindset here. Choose the bottle that supports the product and the business at the same time.
If you are still figuring out presentation and positioning, this guide to selling handmade products online is a useful companion. Packaging shapes expectations before a customer ever opens the cap.
Even outside beauty or wellness, the lesson holds. Good containers signal care, repeatability, and trust. Brands that invest in durable, branded packaging understand that the vessel becomes part of the product experience, whether you are shipping serums or durable branded water bottles.
Practical rule: A 1 oz bottle earns its keep when the product is potent, portable, giftable, or easy to sample, and when the packaging cost still leaves you healthy margin.
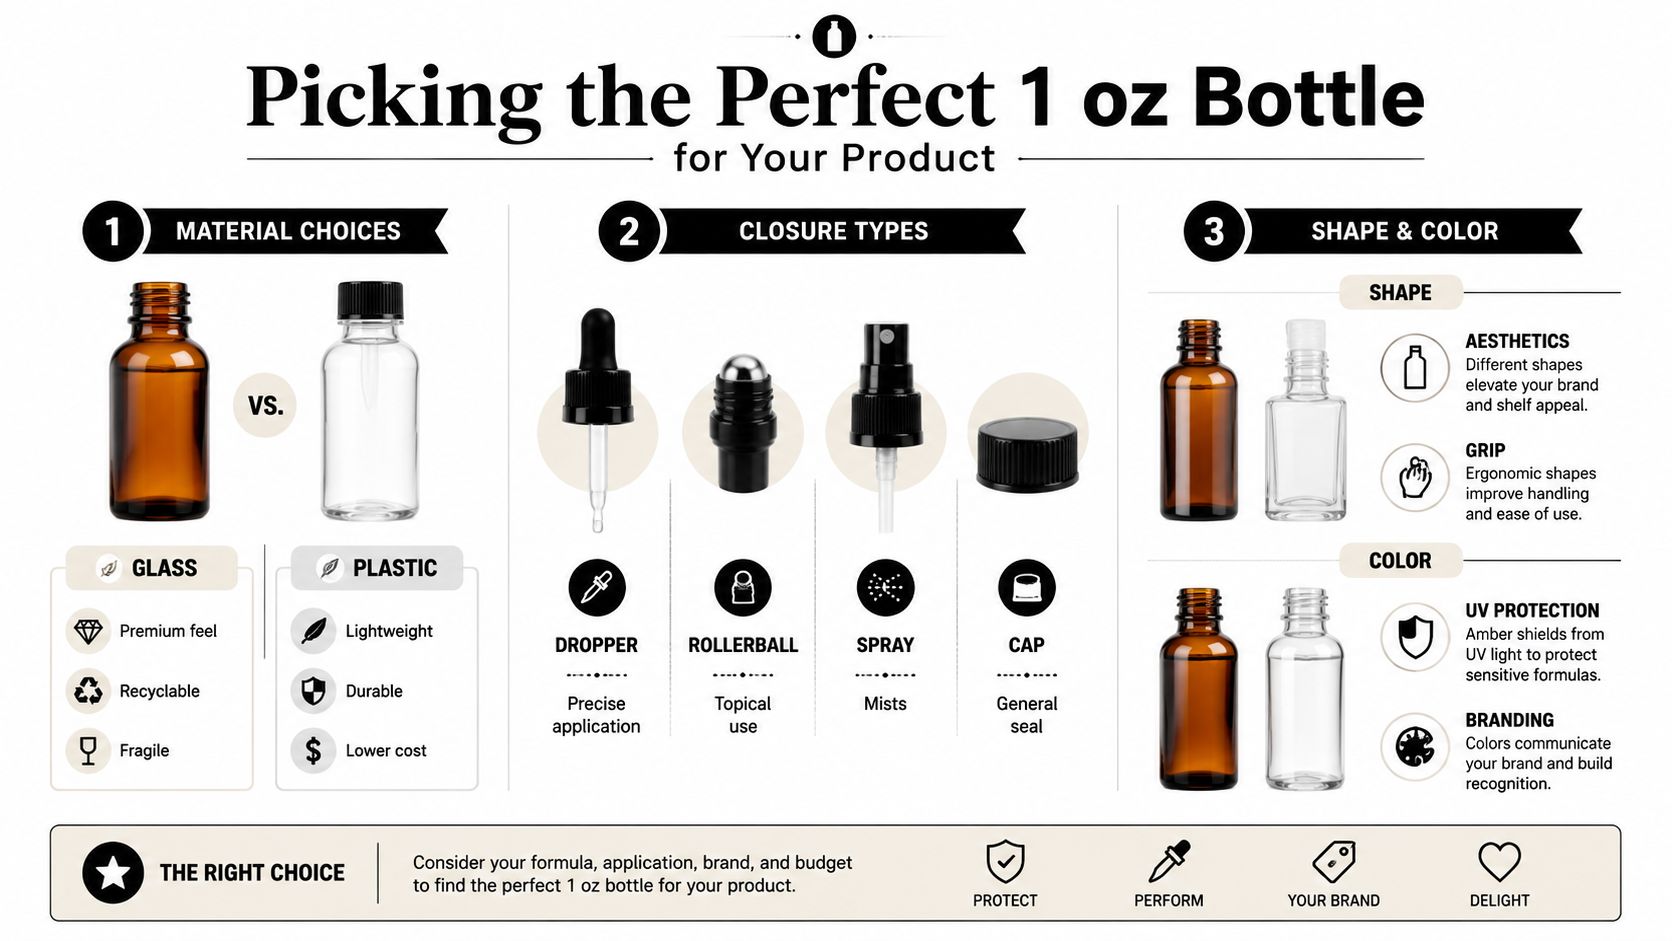
Picking the Perfect 1 oz Bottle for Your Product
The right bottle doesn't start with aesthetics. It starts with what your formula needs to survive real use. Light, air, spills, rough shipping, oily hands, and inconsistent dosing can all ruin the customer experience before your product gets a fair shot.
Start with the product, not the bottle
A lot of makers do this backward. They find a bottle that looks great on a mockup, then force the formula into it. That's where you get leakage, evaporation, contamination, or a closure that dispenses too much at once.
Recent packaging guidance for small-format containers emphasizes barrier protection and precise dispensing, especially for products like serums and herbal formulas, in this product packaging reference. This is the bottle's primary function. It has to preserve quality and reduce waste.
Ask four questions first:
- What hurts the formula most: Light, oxygen, moisture loss, or contamination from repeated use?
- How should it come out: One drop at a time, a fine mist, a roll-on swipe, or a simple pour?
- Where will people use it: Bathroom sink, travel bag, car console, gym kit, or kitchen shelf?
- What failure can't you afford: Breakage, drips, clogging, or a messy neck finish?
Glass versus plastic in real life
Glass usually wins on feel. It gives weight and clarity, and amber glass is a common choice when you want extra protection for light-sensitive ingredients. For oils, tinctures, and facial serums, glass often feels like the right match because the package signals care before the product touches skin.
Plastic wins when shipping stress is the bigger issue. It's lighter, tougher in transit, and often easier on your cash flow when you're testing a product. If you're making something people toss into a bag or use on the go, plastic can be the smarter call even if it doesn't have the same shelf presence.
A quick way to frame it:
| Bottle choice | Usually works well for | Watch out for |
|---|---|---|
| Amber glass | Light-sensitive oils, tinctures, serum-style products | Breakage, higher shipping weight |
| Clear glass | Products where color matters visually | Less light protection |
| Plastic | Travel use, active lifestyles, lower break risk | Can feel less substantial |
| Specialty colors and shapes | Strong brand identity, giftable presentation | Harder reordering, label fit issues |
If you sell fragrance, this gets even more obvious. A product like this 30 mL eau de parfum spray shows how closely bottle style and closure type shape the whole impression of the product.
For broader inspiration on reusable drinkware and rugged material choices, it can help to scan examples of durable branded water bottles. Different category, same useful question. Does the vessel match the way people use it?
Closures decide the customer experience
A dropper tells the customer to go slow and measure. A spray suggests even coverage. A rollerball says direct application. A screw cap is simple, but it shifts the dosing responsibility entirely onto the user.
Pick the closure by how the product should be used, not by what photographs best.
That same packaging logic shows up in products beyond liquids. Vintage Glass Bowl Soy Candle, Lavender & Sage + Cedar Amber, Reusable Fluted Vessel, 7.53 oz | A Second Life by Loyaltie works because the vessel and the product feel aligned. Your 1 oz bottle should do the same thing. The package should explain the product before the label has to.
How to Source Bottles Without Overspending
Sourcing gets expensive when you buy with hope instead of a test plan. A low unit price can still be the wrong buy if the bottle arrives scratched, the cap threads are inconsistent, or shipping wipes out the savings.
The larger packaging world is a good reminder that tiny choices scale fast. In the U.S., Americans purchase about 50 billion water bottles per year, and material choice affects resource use in container manufacturing, as summarized in this bottled water statistics overview. Your operation is smaller, obviously. The lesson still holds. A few cents saved or lost per bottle adds up once you reorder.
Buy samples before you buy inventory
Don't trust product photos alone. Order a handful of bottle and closure combinations, then test them with your actual formula.
Check them for:
- Thread fit: Caps should close cleanly without cross-threading.
- Dispensing behavior: The dropper, sprayer, or reducer should match the viscosity of your product.
- Surface quality: Look for scuffs, waviness, or visible seams that will cheapen the finished look.
- Label area: Make sure you have a flat, usable panel for your front label and any required details.
If the supplier won't work with sample orders, that's useful information. It usually means they're built for larger buyers and won't be flexible when you need help later.
Look past unit price
A bottle quote only tells part of the story. You also need to think about freight, breakage risk, lead time, closure compatibility, and whether you'll be forced into a bigger reorder than you need.
I'd rather pay a bit more per unit for a bottle I can reorder consistently than save money once and then spend weeks hunting for a near-match after the supplier changes stock.
Use a simple sourcing sheet and compare vendors by category:
- Bottle and closure cost
Keep the pair together. A cheap bottle with a finicky dropper isn't cheap. - Shipping realities
Heavier materials cost more to move and can change your margins quickly. - Minimum order comfort
Don't buy months of inventory if your label, formula, or closure choice still might change. - Replacement ease
Try to avoid oddball sizes and finishes unless the look is central to the brand.
When cash is tight, flexibility is worth paying for.
The scrappy move is to build around one reliable bottle family first. Then branch into specialty shapes once the product has proven itself.
The Art of Filling and Sealing Your Bottles
You feel the pressure most on fill day. The formula is ready, the bottles are lined up, and one sloppy pass can leave oil on the threads, uneven fill heights, and a batch that looks amateur before it ever reaches a customer.
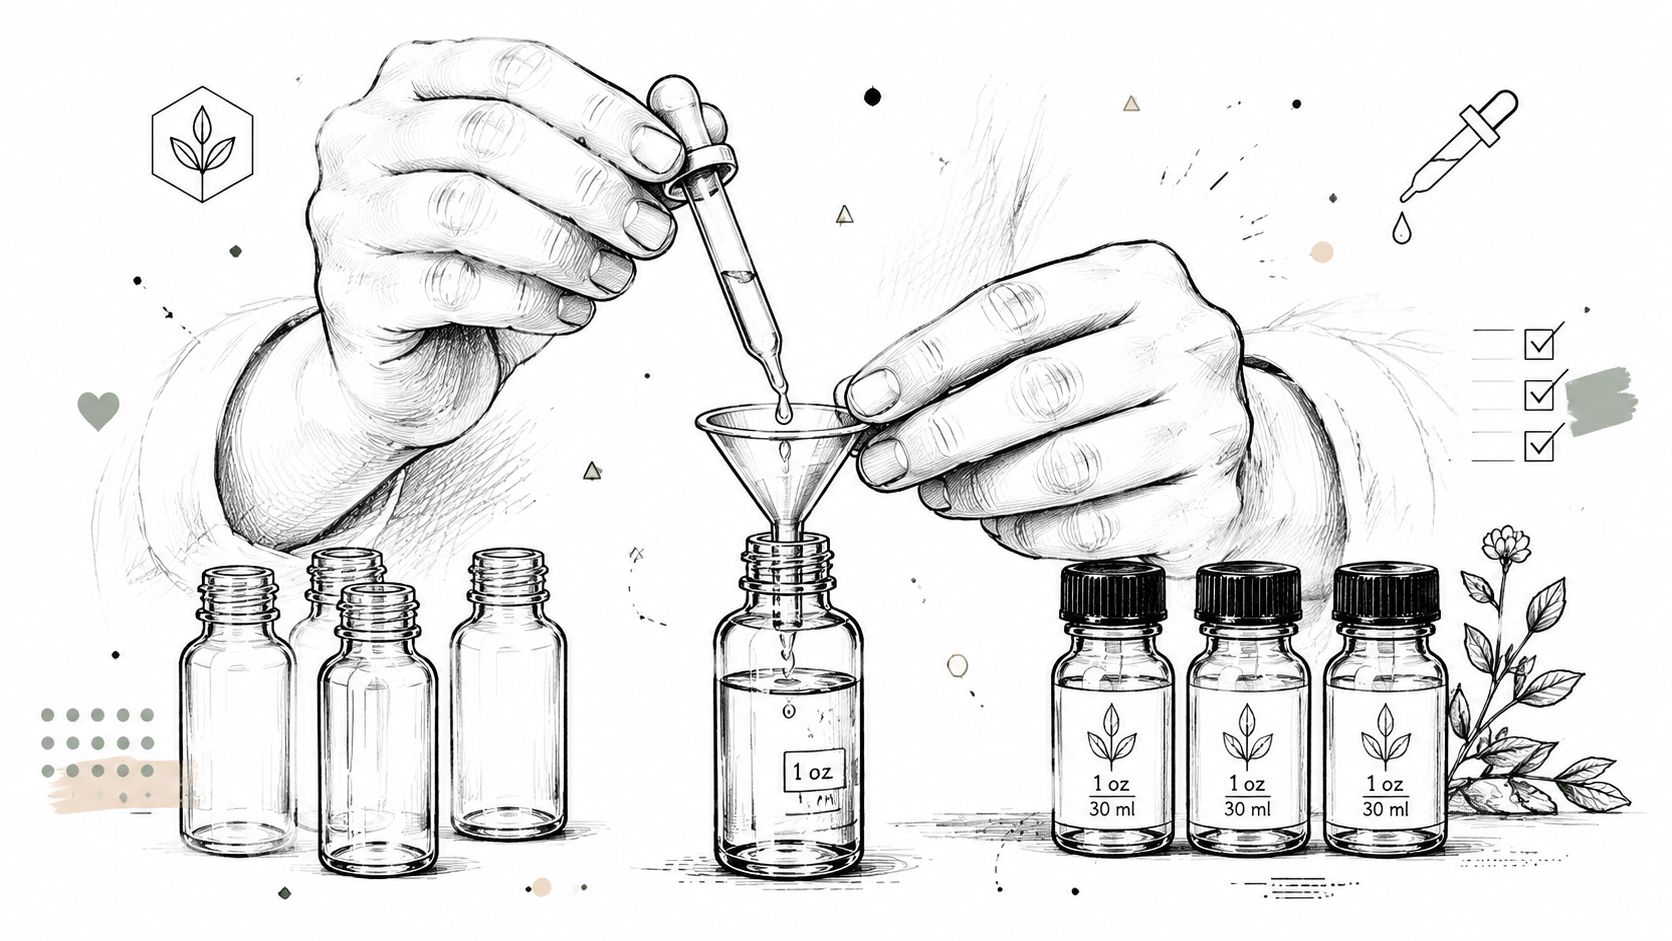
A 1 oz bottle sounds straightforward, but small containers punish inconsistency fast. A little overfill can push product into the neck when you insert the dropper or cap. A little underfill can make the batch look uneven on a shelf. For independent makers, the goal is control. Clean fills, repeatable closure pressure, and a process that still works when you are tired and trying to finish 50 bottles before dinner.
Build a process before you fill a batch
Good results come from setup, not speed.
Start with one finished test unit. Fill a single bottle to your target level, apply the exact closure you plan to use, and let it sit. Check the shoulder, threads, and base after a few hours. If that bottle seeps, bubbles product up into the neck, or leaves residue after wiping, the process needs adjustment before you touch the rest of the batch.
The best small-batch filling routines usually include a few boring habits that save a lot of rework:
- Use the same fill tool for the whole run: Switching between pipettes, funnels, and syringes creates visible variation.
- Set a realistic fill line: Leave enough headspace for the closure to seat without displacing product.
- Wipe bottle threads immediately: Residue in the threads often gets mistaken for a bad cap.
- Work in small trays or groups: If something goes wrong, you catch it before the entire batch is affected.
If you sell oils or serums, appearance matters right away. A product like this beard oil in a 1 oz dropper bottle depends on a clean neck finish and consistent fill height to feel trustworthy in the customer's hand.
Match the seal to the product
Thin liquids, thick serums, alcohol-based blends, and oil-heavy formulas do not behave the same way. That is where many new makers lose money. They assume any matching cap or dropper will do the job.
It will not.
A closure can fit the bottle and still fail in actual use. Droppers can wick product into the collar. Some caps feel tight but do not seal well once the bottle tips during shipping. Inserts can help control dispensing, but they also slow production and change how the customer experiences the product. The right choice depends on what matters most for that SKU: dosing, leak resistance, look, or speed on the packing table.
If presentation matters as much as protection, study brands that treat packaging as part of the product experience and use packaging to build your brand without losing sight of function.
Seal, then test like the package will be used
A quick bench test catches a lot. Fill and close the bottle, turn it upside down, then lay it on its side on clean paper or a lint-free cloth. Leave it long enough to expose a weak seal. Any oily ring, damp spot, or sticky residue means you need to check the closure, the fill level, or how clean the threads were before capping.
Test the filled bottle, not just the empty components.
That last part matters. Product changes everything. Viscosity, oils on the threads, and pressure from the closure all affect whether the package stays clean.
A short visual can help if you're refining your motion and setup:
The best process is the one you can repeat without heroics. If only your most careful day produces clean bottles, the setup is too delicate. Tighten the routine until solid results are normal.
Labeling That Tells Your Brand Story
A 1 oz bottle gives you very little room, so every label choice has to earn its spot. The best labels do two jobs at once. They make the bottle feel like your brand, and they still stay readable when the bottle is wet, oily, or handled a lot.
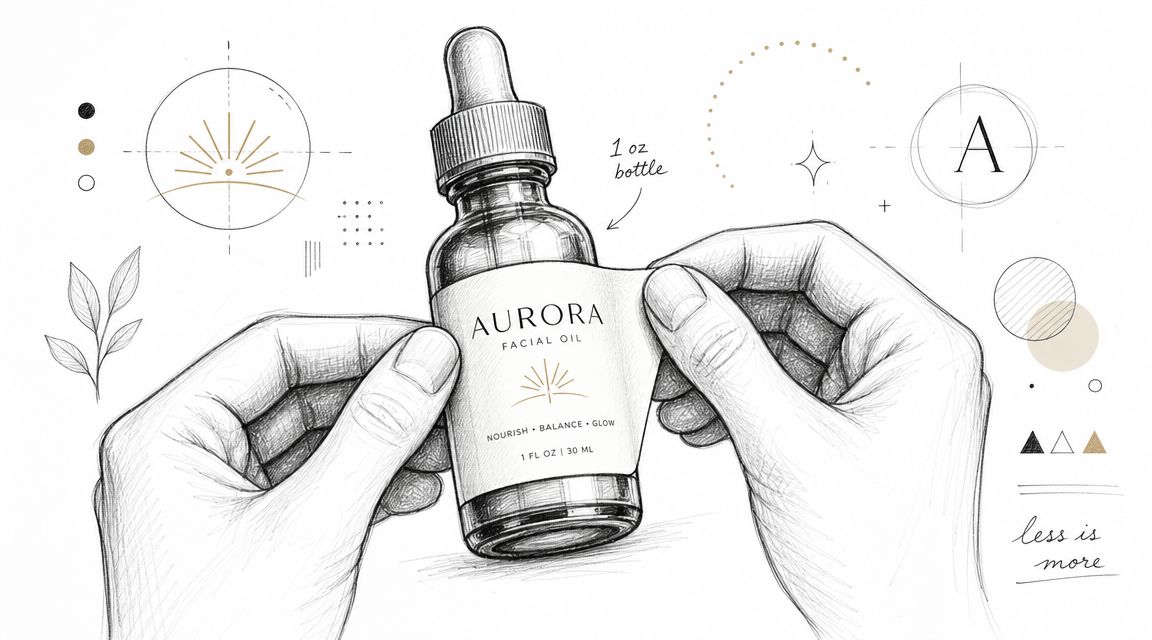
A simple label example that works
Say you're creating a fictional facial oil called Aurora. The formula is delicate, the bottle is amber glass, and you want it to feel calm and grounded rather than flashy.
Textured paper might look beautiful at first, but if the bottle lives near a sink, that choice can turn ragged fast. A more water-resistant stock usually holds up better for everyday use. That matters even more as packaging gets lighter. Industry reporting notes that the average weight of a 16.9 oz single-serve PET bottled-water container fell by 51% between 2000 and 2014, which means modern bottles and surfaces can behave differently with adhesives, as covered in this environmental footprint summary.
The practical read for makers is simple. Test your label adhesive on the exact bottle material you plan to use. Don't assume a label that sticks to one glass bottle will behave the same way on a lighter plastic bottle or a coated surface.
Design for small surfaces
On a 1 oz bottle, crowded design looks nervous. Calm design looks more expensive.
Use this order of importance:
- Brand name first: It should be readable at a glance.
- Product type next: Facial oil, tincture, room spray, beard oil.
- Key detail after that: Scent, hero ingredient, or use case.
- Required information elsewhere: Side or back label if needed.
A lot of makers make the label too decorative and too tiny. If the customer has to rotate the bottle under bright light to figure out what it is, the design failed.
For visual ideas on how packaging elements can shape perception without getting overcomplicated, this guide on packaging to build your brand is a helpful reference.
A good 1 oz label doesn't try to say everything. It says the right things clearly.
Shipping Your Bottles Safely and Smartly
You can make a beautiful product and still lose the customer at the mailbox. Broken glass, loosened caps, and leaked oil don't feel handmade in a good way. They feel avoidable.
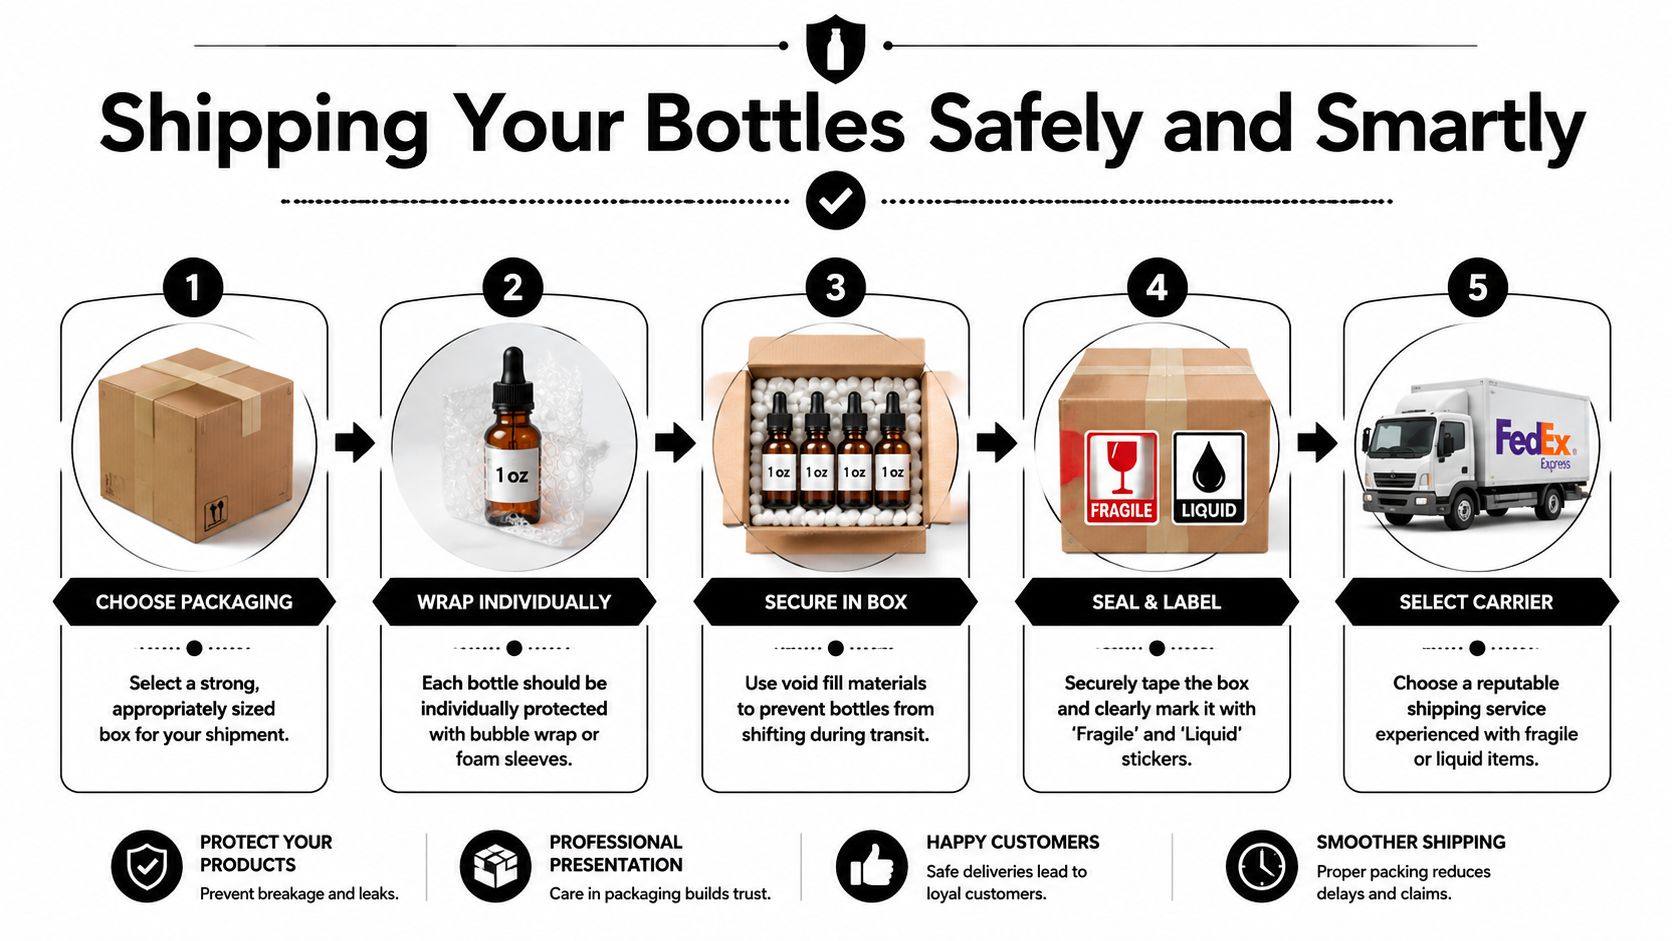
A packing routine that prevents headaches
If you ship liquids in 1 oz bottles, keep the routine simple enough that you'll follow it every single time.
- Wrap each bottle on its own: Glass bottles shouldn't touch inside the box.
- Use snug outer packaging: Too much empty space invites movement and impact.
- Add absorbent protection if needed: Especially helpful for oils or anything that could leak in transit.
- Check cap tightness before boxing: Not after the label is on, and not after the packing slip is printed.
- Shake the packed box gently: If you hear movement, open it and fix it.
If you want a practical refresher on cushioning and void fill, these tips for securely packing fragile goods are useful.
Carrier rules for liquids can vary, so check the current guidance before sending a new product type. That's especially true if you use glass, alcohol-based products, or anything with stronger scent or ingredient restrictions.
When you're ready to get your finished goods in front of more buyers, Loyaltie is a marketplace where people discover and buy directly from the best independent brands in the US.
If you're building a product people will reorder, the 1 oz bottle can be one of your smartest decisions. It keeps entry easy for the customer, gives you room to protect quality, and lets you shape a polished brand without pretending you're a massive company. Buy directly from the maker is already a better experience when the product arrives looking considered, working properly, and feeling like a real step up from mass-produced alternatives.